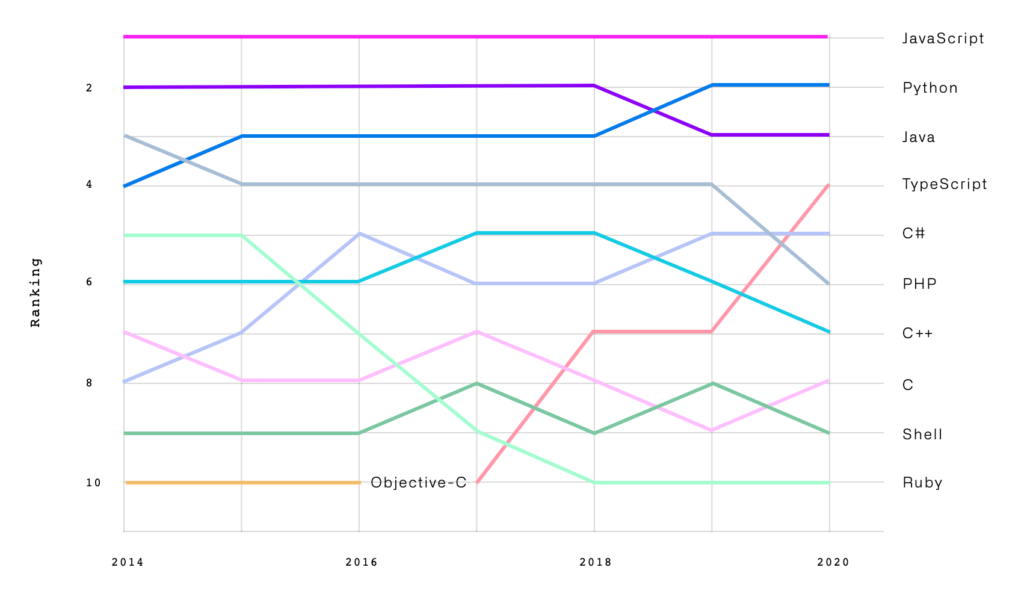
If you are working in web development, you have probably encountered JavaScript at some point. As the following chart shows, it has been a dominating language for many years now, and still holds a strong position, probably due to the large number of frameworks using it (Angular, Backbone, Node, React, Vue.. to name a few).
Then you are probably familiar with the famous logging method: console.log(). But, are you using it to its full potential ? Here is a glimpse of a few powerful hacks to debug JavaScript.
Logging Objects
Let’s dive directly into the core of the console with the objects.
// Let's define some objects
const fruits = {'name': 'Strawberry', 'color': 'red', 'size': 'small', 'image': '🍓'};
const veggies = {'name': 'Broccoli', 'color': 'green', 'size': 'medium', 'image': '🥦'};
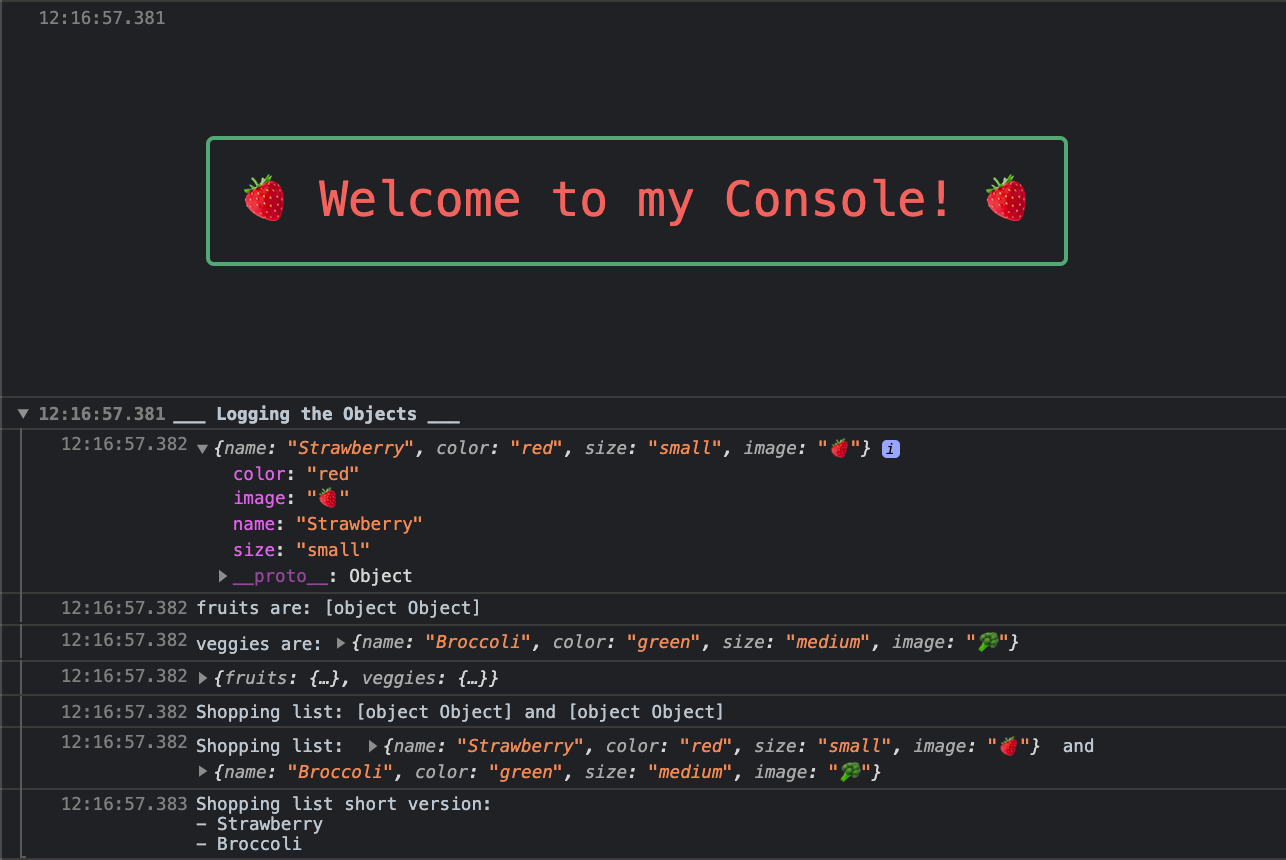
console.group("___ Logging the Objects ___"); // Open a debug group (don't forget to close it at the end)
// 1. straightforward output
console.log(fruits);
// returns: {name: "Strawberry", color: "red", size: "small", image: "🍓"}
// 2. Frustrating output
console.log('fruits are: ' + fruits); // :(
// fruits are: [object Object]
// 3. Using the %o string substitution for objects, it's way better!
console.log('veggies are: %o', veggies); // :)
// veggies are: {name: "Broccoli", color: "green", size: "medium", image: "🥦"}
// 4. Returning multiple objects at once
console.log({ fruits, veggies });
// {fruits: {…}, veggies: {…}}
// fruits: {name: "Strawberry", color: "red", size: "small", image: "🍓"}
// veggies: {name: "Broccoli", color: "green", size: "medium", image: "🥦"}
// 5. log() vs info() to display objects in strings
console.log("Shopping list: " + fruits + " and " + veggies); // :(
// Shopping list: [object Object] and [object Object]
console.info("Shopping list: ", fruits, " and ", veggies); // :)
// Shopping list: {name: "Strawberry", color: "red", size: "small", image: "🍓"} and {name: "Broccoli", color: "green", size: "medium", image: "🥦"}
// 6. Returning object attributes using template literals
console.log(`Shopping list short version: \n- ${fruits.name} \n- ${veggies.name}`);
// Shopping list short version:
// - Strawberry
// - Broccoli
console.groupEnd(); // end of the debug group
⚠️ Pay attention to the backticks (or grave accent) ` ` used in the template literal in #6 above. Also, I often use \n to insert a new line and improve readability.
Colors!
If you’re outputting a lot of logs in the console, it can be useful to have some of them popping out. This can be done by adding a bit of CSS in your console with the substitution string %c :
// 7. Adding colors
console.log('%c Important debug', 'color: red; font-weight: bold;');

// 8. Using colors, string substitution and template literals
const step = 1;
const success = true;
const msg = (success) ? 'success' : 'error';
const msgColor = (success) ? 'green' : 'red';
console.log('%c Debug %c - Step %i: %c%s', 'background: FireBrick; color: white; font-weight: bold', 'font-weight: bold', step, `color: ${msgColor}`, msg);

As #8 is a bit complex and a picture is worth a thousand words, here is a graphical explanation of what is going on with the string substitutions and template literals:

⚠️ Be careful not to add too many colors or you may end up with a headache and that will be rather counterproductive…
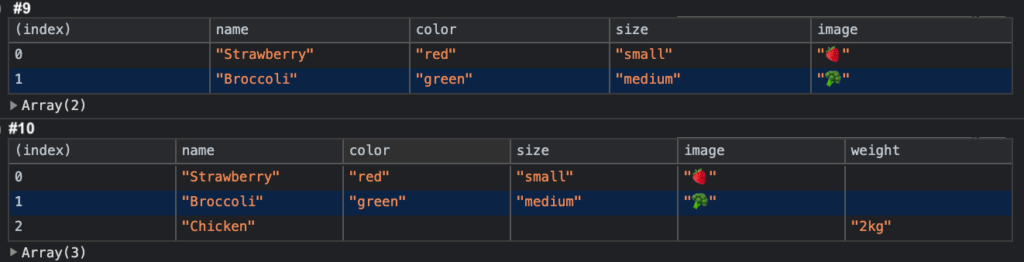
Table Display
Finally, you can display objects as a table to see all your data at a glance. It works perfectly if the objects have the same attributes, but it works also for objects with different attributes. In that case, a new column will be created for each attribute. So, keep in mind not to mix drastically different objects, or you will end up with a very large unreadable table.
const fruits  = {'name': 'Strawberry', 'color': 'red', 'size': 'small', 'image': '🍓'};
const veggies = {'name': 'Broccoli', 'color': 'green', 'size': 'medium', 'image': '🥦'};

// 9. Displaying objects in a table (same attributes)
console.table([fruits, veggies]);

// 10. Displaying objects in a table (different attributes)
const meat = {'name': 'Chicken', 'weight': '2kg'};
console.table([fruits, veggies, meat]);
Going further
To know more about JavaScript console methods, have a look at the full console documentation.
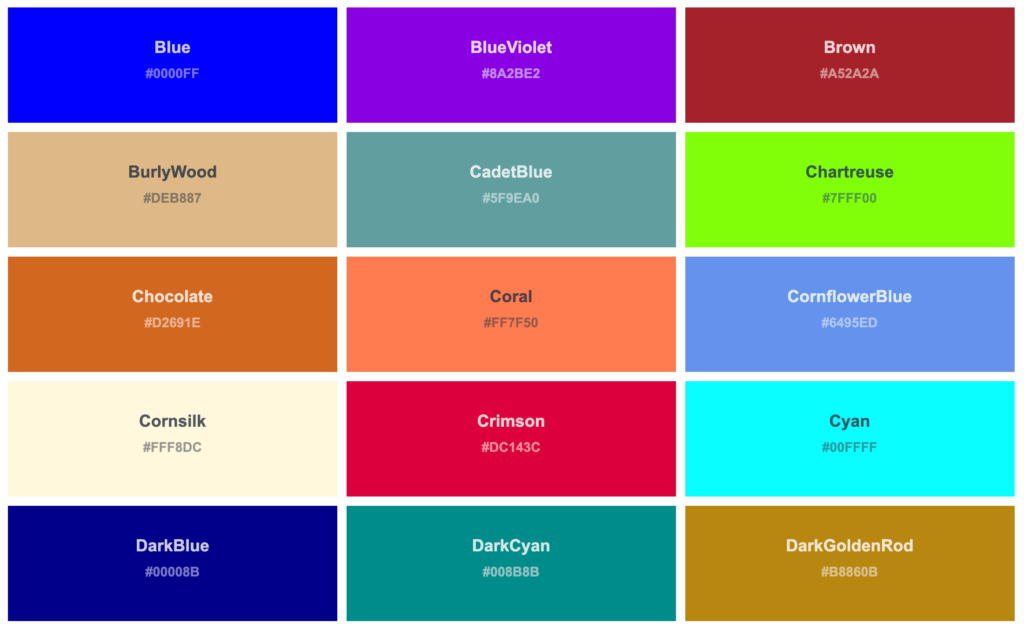
And if you need color inspiration, this is a cheat sheet of the HTML color names supported by all browsers.
👉 You can find all the examples above (and play with them) on the dedicated Codepen: JS Console.log.
Feel free to buy me a coffee (or tea) if you found this article useful 😉